
Air sealing an attic
By Insulation Report Editorial. Last reviewed August 2026. How we research this.
In brief
Air sealing an attic means closing the gaps where indoor air escapes up through the ceiling. The hatch, dropped soffits over kitchen cabinets, open wall tops, the plumbing vent stack, chimney chases, recessed lights, ceiling boxes and duct boots. This is a different job from insulating.
Insulation slows heat through material and does almost nothing about air moving through a hole. So depth laid over an unsealed ceiling falls short of its label, in both seasons. Sealing costs little in materials and a lot in patience. It is the step most often left out of a bid, because when the job is done you cannot see it.
It also carries the moisture argument, which is often the bigger one. Warm indoor air pushed into a cold attic drops its moisture on the roof sheathing. That is where frost, staining, mold and ice dams begin. Seal first. Then baffle the eaves. Then add depth.
The guides hub sets out the order attic work happens in and says air sealing is step one. This page covers the step itself: what is actually leaking, in what order, what to close each opening with, and what a finished job looks like from the hatch.
Two different jobs, and one does not substitute for the other
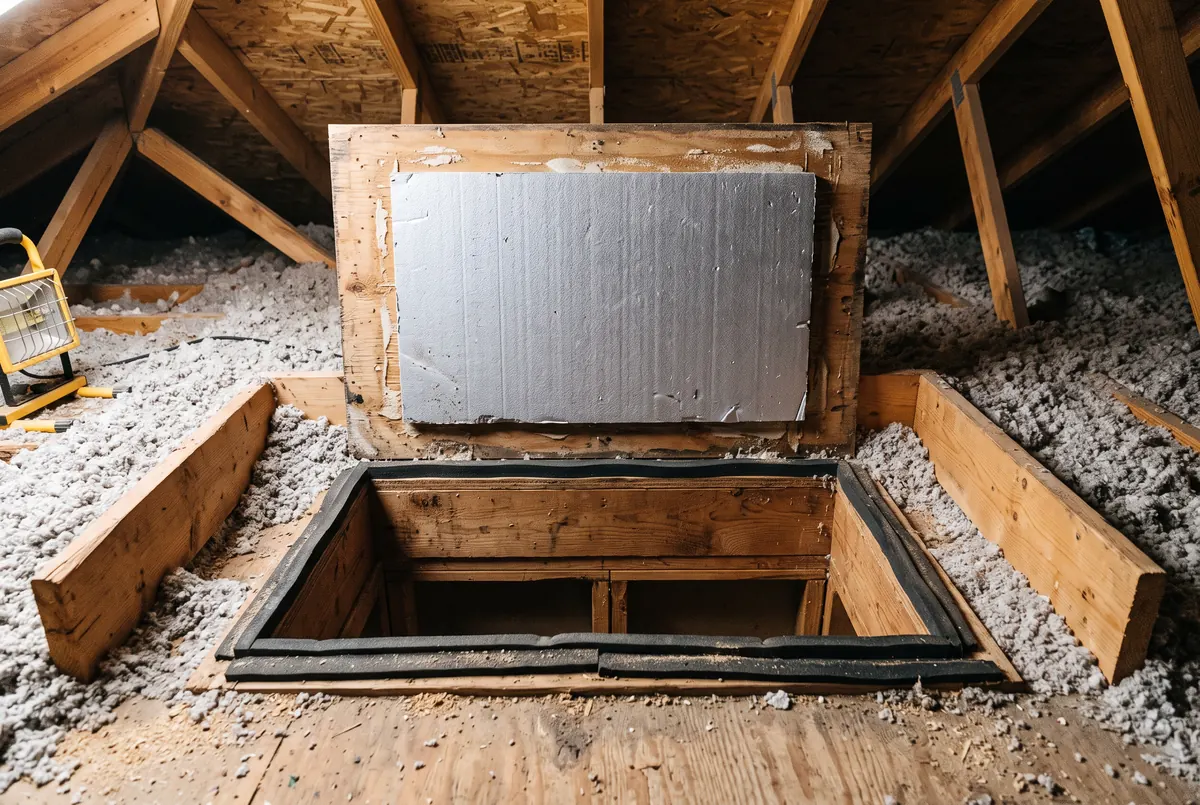
The hole in the middle of the ceiling you just sealed
Rigid board on the back of the cover handles the conduction; the weatherstrip around the frame handles the air, and the air is the bigger term.
Heat leaves a house three ways, and insulation only addresses one of them. R-value measures conduction, which is heat moving through solid material. It is tested by putting a sample between a hot plate and a cold plate, under methods such as ASTM C518. Nothing in that test involves air passing through the sample. The FTC R-value Rule (16 CFR Part 460) then requires that number to be labeled the same way by everyone. So R-value is easy to compare between products. And that is exactly why it is so easy to mistake for the whole story.
Air sealing addresses the second mechanism, bulk air movement. A gap around a plumbing stack does not conduct heat, it carries it, along with the moisture and the dust in that air. No amount of R-value above the gap changes what the gap does, in the same way that closing a window is not a substitute for a coat and a coat is not a substitute for closing the window. The two measures are not additive and not interchangeable, and this is the single most common misunderstanding in attic work.
The stack effect, and why the ceiling matters more than people expect
Warm air is less dense than cold air, so in winter the air inside a heated house is buoyant relative to the air outside it. The house behaves like a chimney: air pushes out through openings high up, which pulls air in through openings low down, and the flow continues for as long as the temperature difference does. That is the stack effect, and it is why a leak in the ceiling is worth more than an identically sized leak in a wall.
Two consequences follow, and both are counter-intuitive enough to be worth stating plainly. The first is that sealing the attic plane reduces the draft felt at floor level downstairs, because the cold air coming in at the bottom of the house is being drawn in by the air leaving at the top. People chase the draft where they feel it, and the fix is usually above their heads. The second is that the stack effect is strongest exactly when heating costs the most, on the coldest days, so the loss is concentrated rather than spread evenly through the season.
In summer the direction is weaker and partly reverses, with a hot attic driving warm air down into the house. Sealing helps in both seasons, but the winter case is the larger one in most of the country, and it is the one that carries the moisture problem with it.
The moisture argument, which is often bigger than the energy one
Warm air holds more water vapor than cold air. Indoor air in winter is warm and, because of cooking, washing, breathing and houseplants, comparatively humid. When the stack effect pushes that air through a ceiling gap into an attic that is close to outdoor temperature, the air cools, its capacity to hold vapor falls, and the water comes out of it on the first cold surface it meets. That surface is the underside of the roof sheathing.
The sequence, in the order a homeowner usually notices it:
- Frost on the nails and the sheathing. Roofing nails poke through the deck and are the coldest thing in the attic, so they frost first. A February morning inspection finds a field of white nail tips before anything else is visible. The attic frost guide reads that evidence rung by rung, from the frost that needs nothing to the pattern that means hiring.
- Damp patches and staining on the deck. The frost melts during a mild spell and wets the plywood. Repeated over a winter, that leaves gray or black tide marks, typically worst above a bathroom, above the kitchen, or directly over the hatch.
- Mold on the sheathing. Wood at a raised moisture content for long enough grows mold, and the diagnosis is often mistaken for a roof leak because the staining is on the deck. A roof leak makes a stain that runs down and follows a rafter; condensation makes a stain spread evenly across the bays, worst near the ridge and near the leak points below. Mold in attic insulation covers what happens once it reaches the material on the floor.
- Wet insulation that stops working. Condensation dripping back down soaks the material below it. Damp loose fill compacts, and compacted material has less trapped air and less R-value than the label it was sold under.
Ice dams are the same mechanism seen from outside. Heat escaping through the ceiling warms the roof deck, snow on the warm part of the roof melts, the water runs down to the eave where the deck is cold because there is no heated space beneath it, and it refreezes into a ridge. Water then backs up behind the ridge and finds its way under the shingles. That is why the fix is at the ceiling plane rather than on the roof: the heat reaching the deck arrived by air movement, and depth does not resist air movement. The symptom guide works back from ice dams and the rest of the usual list to what each one actually points at.
The leak inventory, in rough order
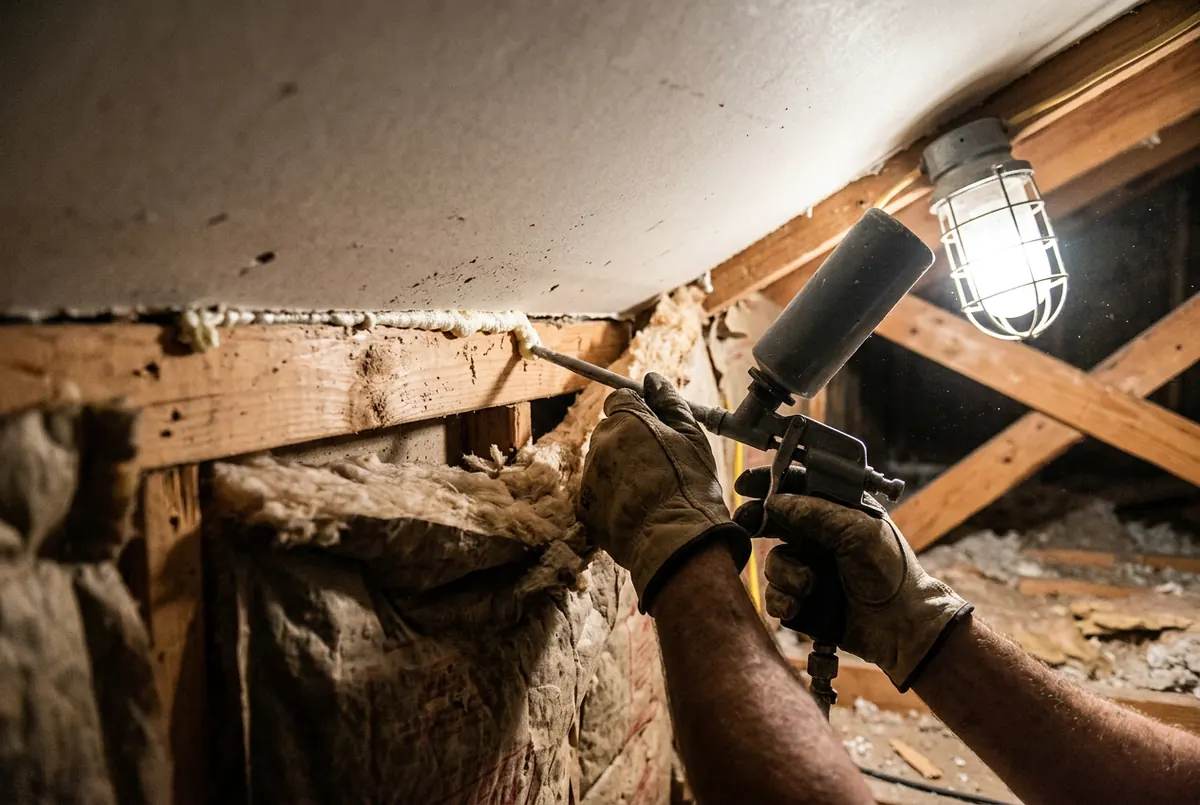
The joint that leaks most is the one nobody can see
Where an interior wall meets the ceiling there is a gap the full length of the wall, hidden under the insulation. Sealing it is cheap; finding it means pulling the insulation back first.
Work the whole ceiling plane rather than the obvious items. These are the usual locations rather than a ranking: this site holds no measured air-leakage data to order them by, and the biggest opening in a given house depends on how that house was built. A chimney or flue chase left open is frequently the largest single opening in a building and is worth finding first if you have one. Every item is easier to reach before insulation goes down and effectively hidden afterwards.
| Where it leaks | Why | What to close it with |
|---|---|---|
| Attic hatch, scuttle or pull-down stair | A framed hole in the middle of the ceiling with a loose lid resting on it. Pull-down stairs are worse than a hatch: the frame is wider, the panel is thin, and the springs hold it against nothing. | Adhesive-backed weatherstripping on the frame, rigid foam board glued to the back of the panel and taped at the edges, plus a latch that pulls the lid down onto the strip. A stair takes an insulated box or tent over the whole opening instead. |
| Dropped soffits over cabinets and above showers | The boxed-out ceiling above kitchen cabinets and bathroom surrounds is usually open framing straight into the attic. From above it reads as a rectangular pit filled with insulation, and the insulation is sitting on nothing. | Rigid foam board or thin plywood cut to the opening, dropped in, and sealed to the framing all the way round with canned foam or caulk. Cover it with insulation afterwards. |
| Open wall top plates | Every interior partition wall meets the ceiling at a top plate of nominal 2x stock, 1.5 inches thick as dressed. The drywall on each side rarely lands tight against it, so the wall cavity below is connected to the attic along its whole length. | A bead of caulk down each side of the plate where the drywall meets it. Wider gaps and the open cavities at the ends take canned foam. |
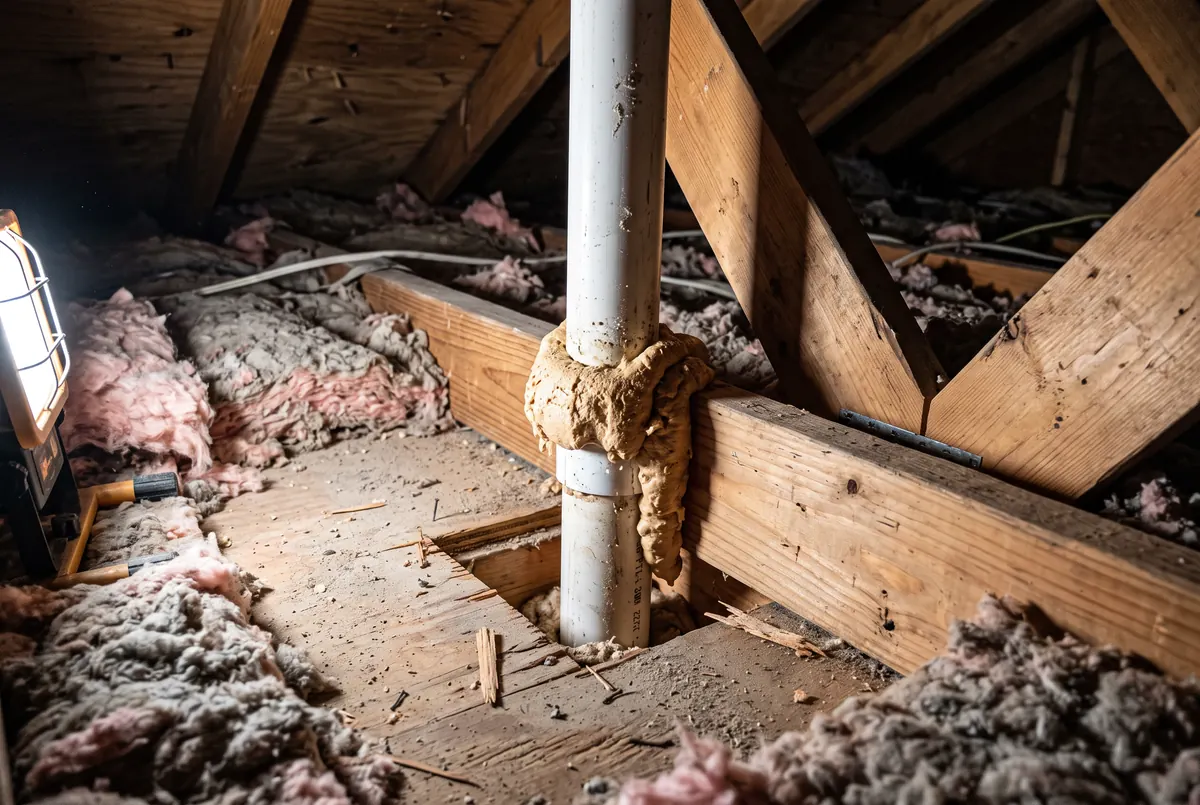
| Plumbing vent stack penetration | The stack is cut oversize through the ceiling and the top plates so it can move, and the gap around it runs the full height of the house down to the fixtures. | Canned foam in the annular gap, or a collar of rigid board foamed to the ceiling and to the pipe. The pipe is plastic or cast iron and is not hot, so ordinary foam is appropriate here. |
| Chimney and flue chases | Often the single largest opening in a ceiling, and the warmest, so the stack effect drives the most air through it. A masonry chimney is framed with a deliberate gap around it and a metal flue passes through a chase that is open top to bottom. | Sheet metal cut to fit and fastened down, sealed to the ceiling with a high-temperature sealant, holding the clearance the flue listing and the model code set. Never canned foam, plastic or tape against a flue or chimney. |
| Recessed light fixtures | A non-IC housing is perforated on purpose so it can shed heat, which makes it a chimney in miniature. Even an IC-rated airtight housing leaks at the trim ring if it was never sealed to the drywall. | From below, caulk the trim to the ceiling. From above, keep the clearance the fixture label requires, which normally means a rigid non-combustible dam rather than a wrap. Replacing an old housing with a sealed IC-rated one solves the leak and the clearance together. |
| Ceiling boxes, bath fans and kitchen fans | Fan housings are sheet metal boxes with seams, mounted into a hole cut larger than they are. A bath fan discharging into the attic instead of outdoors adds a moisture source on top of the leak. | Caulk the housing to the drywall from below or foam it from above, and confirm the duct runs to an exterior termination. Light and fan boxes take caulk at the box-to-drywall joint and at any knockout still open. |
| Duct boots and register penetrations | Where a supply duct meets a ceiling register, the boot is fastened into an oversize hole and rarely sealed to the drywall. Air leaves the duct and the room at the same joint. | Duct mastic, or foil tape sold for duct sealing, at the boot-to-drywall joint and at every seam in the boot. Not cloth-backed duct tape, which lets go in an attic within a few years. |
Two more belong on the list, without needing a row each. Any hole for wiring or pipe through the tops of walls, which takes a bead of caulk or a squirt of foam. And the joint where an attached garage ceiling meets the house. That one is both an air leak and a route for exhaust fumes into your living space.
Fire blocking and the flue clearance
Two of the materials above will burn. And the openings you are closing are often the ones the model residential code says need fire blocking. A chase running from a basement all the way to an attic is a path for fire as well as for air. Closing that with something that burns is worse than leaving it open. So use sheet metal, or another material that will not burn, wherever a chase runs straight up and unbroken. Save the foam and board for holes that do not.
The flue is the hard rule. A metal flue and a masonry chimney run hot in normal service, and the gap around them exists to hold a clearance to combustible material. Filling it with foam, plastic or ordinary insulation removes that clearance. The correct method is a sheet metal collar sealed with a high-temperature sealant, and any insulation brought up to it is unfaced non-combustible material stopping short of the flue. If you cannot identify the appliance, the flue type or the clearance it needs, this is the penetration to leave for a contractor and to seal nothing else near.
Materials, and the shopping list
The material list is short and the choice is mostly about how wide the gap is. Nothing here is expensive; the cost of air sealing is almost entirely the time spent crawling to each opening.
| Material | Use it for | Watch for |
|---|---|---|
| Caulk, acrylic latex or silicone | Thin cracks and joints: drywall to top plate, box to drywall, trim ring to ceiling | Useless across a gap wider than a bead will bridge. It sags and falls out rather than failing visibly |
| Canned polyurethane foam | Gaps too wide for caulk: around the plumbing stack, wiring penetrations, the ends of open cavities | Combustible. Never against a flue or chimney. Use the low-expansion type near anything that can be pushed out of position |
| Rigid foam board | Openings you could put a hand through: dropped soffits, open chases, the back of the hatch | Also combustible, and where it stays exposed in an attic it usually needs a covering or an ignition barrier. Foam or caulk it in at every edge or it is a lid, not a seal |
| Sheet metal and high-temperature sealant | The only correct closure around a masonry chimney or a metal flue | Cut to hold the clearance the flue listing and the model code set, fastened down so it cannot be displaced |
| Weatherstripping | The hatch or scuttle lid, and the frame of a pull-down stair | Needs a latch or catch pulling the lid onto it. A strip with nothing compressing it seals nothing |
| Duct mastic or foil tape | Boot-to-drywall joints and seams in duct boots | Cloth-backed duct tape releases in attic heat. It is the wrong product for ducts |
The shopping list
Insulation Report earns a commission if you buy through some of the product links on this page. It costs you nothing extra and it does not change which products we recommend or what we say about them.
-
Look for Labeled for windows and doors, or low expansion. The high-expansion kind bows what it fills.
Closes the gaps around plumbing stacks, wiring holes and top plates, which is where most of the air goes.
Skip it if The gap is wider than about three inches, where rigid board plus sealant is the better closure.
-
Look for Explicitly labeled as fire block or fire stop, usually orange. Ordinary foam is not a substitute.
Penetrations that pass between floors are fire paths as well as air paths.
Skip it if Never use ordinary foam where fire blocking is called for, and never use any foam against a flue.
-
High-temperature sealant and sheet metal
Look for Sealant rated for the temperature at a flue, plus aluminum or galvanized flashing you can cut.
The gap around a chimney or metal flue gets closed with metal and high-temperature sealant, holding the clearance the flue listing sets.
Skip it if You cannot identify the appliance, the flue type or the clearance it requires. That penetration is the one to leave to a contractor.
-
Look for Any thickness you can cut cleanly. Foil-faced is easier to tape.
Caps large openings: dropped soffits over cabinets, open wall top plates, chases.
Skip it if Every opening you found is small enough to foam directly.
-
Look for An acrylic latex or siliconized acrylic rated for gaps up to a quarter inch.
The small stuff: ceiling boxes, the perimeter where top plates meet drywall, wiring penetrations.
Skip it if Nothing, if you are sealing at all. It is the cheapest item here.
-
Look for A metal-bodied dispensing gun that takes pro-size cans, with a needle valve you can shut between uses.
A straw can is one-shot: leave it an hour and it sets solid inside. A gun restarts for weeks, meters a thin bead instead of a blurt, and reaches into a joist bay one-handed. Air sealing is dozens of small holes over more than one session, which is exactly the shape of job a straw is worst at.
Skip it if You have four or five holes to seal and will finish in one afternoon. One straw can costs less than the gun and you will not miss it.
-
Look for A retractable blade with spare blades in the handle.
Rigid board is scored and snapped rather than sawn, and a blunt blade tears the foam instead of cutting it. Blades are consumable on foil-faced board.
Skip it if You own one. Almost everybody does, and any of them cuts foam board.
-
Look for Foil, not cloth duct tape. Duct tape fails in an attic within a few summers.
Seams in rigid board, and duct joints you can reach.
Skip it if You are not using board and your ducts are outside the attic.
The hatch is its own short list, because it is the one opening left in a ceiling you have just sealed and almost every one of them is bare.
-
Hatch or scuttle insulation cover
Look for Sized to your opening, and taller than the finished insulation depth around it.
Insulates the back of the hatch and stops loose fill pouring into the opening.
Skip it if Your hatch already has rigid insulation fixed to its back and a dam around the opening.
-
Look for Zippered, sized to the ladder frame.
A pull-down ladder is a large uninsulated panel plus a gap all the way round it.
Skip it if You have a hatch rather than a ladder, or the ladder is in a garage outside the thermal boundary.
-
Look for Adhesive foam or rubber, thick enough that the hatch compresses it when closed.
The cover stops conduction. The weatherstrip stops the air, and the air is the bigger term.
Skip it if Nothing. Buy it with the cover; a cover on an unsealed hatch does half a job.
Safety, briefly
Sealing means putting your face right up against every hole, in a hot closed space full of things that irritate your lungs. So the minimum is a fitted respirator, not a dust mask, plus sealed eye protection, gloves and boards to kneel on. The federal breathing protection standard binds an employer over its crew. It does not cover a homeowner in their own attic. Up there, protecting yourself is entirely on you. And fit a working carbon monoxide alarm before the work, not after.
Sequencing: why this happens before the insulation
Air sealing is step one for a mechanical reason rather than a philosophical one. Every leak in the inventory above is at the ceiling plane, which is exactly the surface insulation covers. Once material is down you cannot see a top plate, a soffit drop or a wiring penetration, and you cannot seal what you cannot find.
The price of the wrong order, in the order the costs arrive:
- You handle the material twice. Loose fill has to be raked back from every leak and re-leveled afterwards, batts have to be lifted and refitted, and both leave the job less even than it was.
- You pay for a second visit. A crew that has demobilized charges to come back. Sealing quoted in the same visit as new insulation is a small addition to a job already happening; sealing bought on its own two years later is a job of its own.
- You lose the inspection. The pass across a bare ceiling is when the knob-and-tube wiring, the bath fan discharging into the attic and the disconnected duct get found. Under a fresh blanket of loose fill, none of it is visible.
One thing must not be sealed: the path from the soffit vents up into the attic. The model International Residential Code sets a minimum of 1 inch of clear air space between insulation and the roof sheathing where eave or cornice vents are installed, and that channel is what baffles exist to protect. These come from the model International Residential Code. Your state, and often your city, decides which edition applies where you live and whether it was changed. Your local building department is the only authority on that. And these rules cover new building and permitted work, not a top-up you choose to do on an attic you already have. Baffles go in after sealing and before depth, and attic ventilation covers how the rest of the system works. The installation sequence puts all three steps in order.
How to tell whether it worked
Air sealing produces no visible result, which is why it is easy to underdeliver and hard to audit. Three checks, in increasing order of cost and precision.
Look for dust staining, which is free
Where air moves through insulation on its way out of the house, the insulation acts as a filter and the dust it catches stains it gray or black. That staining is a map of the leaks, and it is the reason an experienced installer walks an attic looking at the surface of the material rather than at the framing. After sealing, the old marks stay where they are, so what matters is whether new ones appear over the following winter. Photograph the stained spots before the work so there is something to compare against. The inspection guide sets out the rest of the walk-through.
Check the sheathing in winter, which is nearly free
Frost on the nail points and the deck is the most direct evidence that indoor air is reaching the attic. On a cold morning after the work, a deck that is dry and a nail field with no frost is a real result. Damp that persists after sealing points at a moisture source in the attic itself: a bath fan discharging into it, an unsealed duct, or a crawlspace below the house feeding the whole stack.
Blower door testing, which is the measured answer
A blower door is a calibrated fan fitted into an exterior doorway with a shroud and a manometer. It pressurizes or depressurizes the house and reports how much air it has to move to hold a standard test pressure, which is expressed as a flow rate and as air changes per hour at that pressure. Two things about it are worth knowing before paying for one.
- It measures the whole building, not the ceiling. A single number cannot tell you where the leakage is. Its diagnostic value comes from running it with an infrared camera or a smoke pencil, which makes the leak paths visible while the fan is holding the house at pressure.
- Its comparative value is the real one. A test before and after, by the same operator with the same setup and the same openings configured the same way, measures what the work actually changed. A single after-the-fact test tells you very little about the job you paid for.
Ask the tester what a good result looks like for your house, your climate and its age. The target depends on all three, and the person running the test is the right place to get it.
Do it yourself, or buy it?
Air sealing is the part of attic work most worth doing yourself, because it is cheap in materials and expensive in labor, which is the profile that rewards your own time. It is also the part with the clearest reasons to stop. The rows below are the ones specific to sealing. The general access questions, low clearance, no walkable framing, a knee wall or a cathedral slope, apply to any attic job and are worked through on do it yourself or hire. Work down the table and take the first row that matches.
| If this is true | Then |
|---|---|
| Loose gray-brown pebble-like granules on the attic floor | Stop and touch nothing. Assume vermiculite and see the vermiculite page. Sealing disturbs material, and that is the one thing not to do here |
| Knob-and-tube wiring, unidentifiable wiring, or several non-IC recessed fixtures | Get an electrician in first, then decide. Do not seal or cover anything near unknown wiring |
| A masonry chimney or metal flue passes through the attic | Buy that penetration even if you do the rest. It needs non-combustible closure at a clearance you have to be certain about |
| Furnace or water heater inside the house that vents by natural draft | Buy the work, or at minimum buy combustion safety testing afterwards. Reducing leakage can change how those appliances draft |
| You are already buying insulation | Buy sealing in the same visit, as its own line item. It is the cheapest it will ever be and you get to see the hours |
| Open walkable attic, sound wiring, no flue, and a weekend available | Do it yourself. This is the case the material list above is for |
Reading a quote, since there is no square-foot price for this
Insulation is priced by area. Air sealing is priced by time, because the number of penetrations rather than the floor area sets the work. This site carries no measured hour count for sealing an attic and therefore publishes no total, but the hourly side can be built from parts.
| Input | Value | Basis |
|---|---|---|
| Insulation worker mean hourly wage | $26.32 | Measured. BLS OEWS May 2025, SOC 47-2131 Insulation Workers, Floor, Ceiling and Wall, national mean hourly wage. Retrieved via the BLS public API. |
| Burden multiplier on the wage | 2.0 to 3.0 | Estimated, not measured. Covers payroll tax, workers compensation, liability, vehicles, overhead and profit |
| Billed crew hour | $52.64 to $78.96 | Derived: wage times burden, for one worker for one hour, so a two-person crew bills roughly double this per hour on site. Inherits the estimate above, so treat it as a bracket |
Wage data is May 2025. Use the bracket to sanity-check the shape of a bid rather than to predict it: a quote that implies far more hours than the penetration count justifies, or one that folds sealing invisibly into a per-square-foot insulation price, is worth a question. The cost hub builds installed insulation pricing the same way, from inputs with stated bases.
Get quotes for air sealing and insulation
If the table above came out as hire, tell us the job and your ZIP. We pass it to a licensed contractor who works in your area.
A marketing service, not a licensed contractor. Insulation work is performed by independent licensed local contractors.
- What happens next?
- Your request goes to a licensed insulation contractor near you, usually within about an hour during the day.
You may not need this
Three situations where the honest answer is that the ceiling plane is not your project.
- An unvented, conditioned attic. If the insulation is on the underside of the roof deck rather than on the attic floor, and there are no soffit or ridge vents, the air barrier is at the roof, not at the ceiling. Sealing the ceiling in that assembly closes the path between two spaces that are both meant to be inside. Look at the roofline for the boundary instead.
- A recent house already tested tight. Newer construction is generally built to an air-barrier detail. In much of the country it is also tested with a blower door before anyone moves in. Look for dust staining at the penetrations, winter frost on the sheathing, a hatch with no gasket, and open recessed housings. If none of those show up, the ceiling has already had this work done, and the remaining leakage is somewhere else.
- The leakage is genuinely elsewhere. Rim joists, a vented crawlspace, ducts running outside the thermal boundary and a leaky basement door are all real and none of them is fixed from the attic. This is the case where paying for a blower door test with an infrared camera first saves you from sealing the wrong plane.
There is also a version of this in reverse. If your attic is already within about R-10 of the level recommended for your climate zone, more depth is a slow payback and sealing is the better spend, because conductive heat flow scales as one over R and the late steps remove very little of what is left. Is attic insulation worth it? runs that arithmetic step by step, including why it is not a prediction of a bill. That R-10 threshold is this site's own estimate rather than a measured figure.
Zone-by-zone targets, including the lower retrofit figures where some insulation is already down, are on the R-value page.
The depth checker turns a tape measurement into an R-value range, and the calculator takes a ZIP and a floor area and returns the target. We do not sell insulation and we do not install it, which is why this page can tell you the cheap step may be the only step you need.
Related
- How to install attic insulation: the full sequence
- Baffles: keeping the eave path clear
- Adding over the material you already have
- Is more attic insulation worth it?
- Insulation types compared, and R-value targets by climate zone
- Do it yourself or hire a contractor?
- What each attic job needs, and the specification to look for
What a sealed penetration looks like
The gap around a stack runs the full height of the house. A foam collar closes it, and this is the single most common one people find first.
Common questions
Can I air seal after the insulation is already down?
Yes, but it becomes a different job. Loose fill hides the top plates, the dropped soffits and the wiring penetrations. So the work starts by raking material back from every area you plan to seal. It ends by spreading that material out again and topping up whatever was lost or packed down. On a deep attic that is most of a day before any sealing happens. It is still worth doing where the ceiling is genuinely leaky, because the leakage does not improve on its own. But it is why sealing is quoted alongside new insulation rather than after it. If a top-up is anywhere on your horizon, wait and buy both in the same visit.
Can I spray foam around my chimney or flue?
No. This is the one instruction on this page that is a safety matter, not a performance one. Canned polyurethane foam, plastic sheet and tape all burn. None of them may sit against a masonry chimney or a metal flue. Close that gap with sheet metal instead. Fasten it down and seal it with a high-temperature sealant, holding the clearance that the flue listing and the model code call for. Any insulation you bring up to it has to be unfaced and non-combustible. If you cannot identify the flue or the clearance it needs, leave that penetration for a contractor.
What does attic air sealing cost?
Sealing is priced in crew hours, not square feet. The time comes from how many holes there are, not how big the floor is. Take the BLS average wage for insulation workers, multiply by an ordinary construction figure for what a worker costs beyond pay, and you get a billed crew hour. That is one worker for one hour, so a two-person crew bills roughly double that per hour on site. The multiplier behind it is an estimate, not a measurement. And we hold no measured price for sealing itself. So use the number to check the shape of a bid, not to predict it. Ask for sealing as its own line so you can see the hours behind it.
Will air sealing make my house too tight?
Sealing the ceiling of an ordinary house rarely makes it tight enough to need mechanical ventilation. But a different risk arrives sooner. Say a furnace or water heater takes its combustion air from inside the house and vents on its own natural draft. Cutting the leakage can change how well it drafts. That is a carbon monoxide question. Any house with appliances that vent that way should get combustion safety testing after serious sealing work. And it should have a working carbon monoxide alarm either way.
Does air sealing replace attic ventilation?
No. They do opposite jobs, and you want both. Sealing stops indoor air, and the moisture it carries, from getting into the attic at all. Venting moves outside air through the attic, so whatever does get up there dries instead of condensing on the sheathing. A sealed ceiling makes the vents work better, because they are no longer fighting a steady supply of warm wet air from below. One thing sealing must never do is block the path at the eaves that the soffit vents feed.
How do I know whether the sealing worked?
Three checks, cheapest first. In winter, look for frost or damp on the underside of the roof sheathing. It should be gone. Next, look at the insulation around the old leak points for gray or dark staining. That is dust filtered out of escaping air. Check that no new staining appears. Then, if you want a number, get a blower door test before and after, by the same operator with the same setup. That gives you a measured change instead of an impression.
What does a blower door test actually measure?
A calibrated fan goes in an outside doorway. It pushes air into the house, or pulls it out, and reports how much air it has to move to hold a standard test pressure. That is a whole-house leakage number, not an attic number. On its own it cannot tell you the ceiling is the problem. Its value is in finding and comparing. Run it with an infrared camera or a smoke pencil and it locates leaks. Run it before and after the work and it measures what changed.