
Blown-in attic insulation: how it works, and how to get it right
By Insulation Report Editorial. Last reviewed August 2026. How we research this.
In brief
Blown-in insulation is loose fiber. A hopper machine feeds it down a hose into the attic. One person works the hose while a second keeps the machine loaded. Because it goes in loose instead of as cut pieces, it flows around wiring, bracing, truss webs and uneven joist spacing.
Batts have to be cut around all of that. This is the whole reason blown-in is the default for an open attic floor. Two materials dominate. Fiberglass gives R-2.2 to R-2.7 an inch. Cellulose gives R-3.2 to R-3.8. So cellulose hits the same target in less depth, while fiberglass weighs less on your ceiling and handles a small leak better.
When blown-in fails, it is the install, not the material. Air sealing skipped. Soffit vents buried instead of baffled. Depth running thick at the hatch and thin at the eaves. Or blown to label depth with nothing left over for settling.
What blowing actually is
The materials hub compares every attic material against every other one, including where blown-in loses to spray foam or to batts. This page is about the method itself. What the machine does. What a good install looks like from inside the attic. And how to tell afterward whether you got what you paid for.
The equipment is one machine and one hose. Bags of compressed fiber are torn open into a hopper, an agitator breaks the compressed slabs back into loose fiber, and a blower pushes that fiber down a long flexible hose to whoever is holding the far end. Rental machines and contractor machines work the same way. They differ in how fast they move material and how much they fluff it. The hose is the whole reason this method exists. It reaches across an attic with no floor to walk on, over the top of ducts and framing, and into the shallow triangle at the eaves where nobody can kneel.
It is a two-person job by design, not by preference. One person stays at the machine at ground level, cutting bags and feeding the hopper at a steady rate, because a starved hopper blows thin and an overloaded one jams the hose. The other works the hose in the attic. Blowing an attic floor runs about 9 to 12 crew-hours per 1,000 square feet, which on a 1,200 square foot floor is 10.8 to 14.4 crew-hours, or 5.4 to 7.2 hours on site for two people. That bracket is an estimate from secondary trade guidance rather than a measurement, and setup, air sealing and cleanup sit outside it, which is why a job quoted as an afternoon usually is not one.
Why loose fiber beats a cut piece on an attic floor
An attic floor is nothing like the tidy rectangle a batt is cut for. Joist spacing is uneven. Truss webs cross the bays. Cables and boxes sit on the ceiling. And the space at the eaves narrows to nothing. Loose fiber takes the shape of whatever it lands in, so none of that has to be cut around.
That advantage belongs to the open attic floor and nowhere else. Blown material is not a substitute for air sealing. It does not stop air moving through gaps in the ceiling below it. And in a closed cavity, like a wall or a sloped ceiling, it is a different job with a different density target. Everything below is about open blowing over an attic floor. For regular framing bays you can reach, such as knee walls and the hatch itself, cut material still wins, which is the case the fiberglass batts page makes and the blown-in against batt comparison weighs in full.
What changes at the hose, once the material is chosen
You choose between the two loose fills on three things: R per inch, how they handle water, and how much they settle. The materials hub sets them side by side against foam, mineral wool and batts, and the cellulose against fiberglass comparison settles the choice between the two. But three more differences only turn up after you have chosen, at the machine and on the ceiling. None of them appear in a material table.
| At the machine and after | Blown-in fiberglass | Blown-in cellulose |
|---|---|---|
| Blowing density | Lower. Fluffs hard leaving the hose, so depth reads high on day one | Higher. Lands more compact and packs down further |
| Dust during the work | Glass fiber and binder dust, an irritant to skin, eyes and airways | Heavy paper and borate dust, dense enough to cut visibility in the attic |
| Weight on the ceiling | About 0.70 lb per sq ft at R-49, from the anchor product's published coverage | About 2.02 lb per sq ft at R-49, from the maker's published chart. Roughly 2.9 times the fiberglass |
Why the same bag reads differently on day one
The agitator in the machine tears the compressed slab apart and the blower drives air through it, so material lands with far more air in it than it had in the bag. Fiberglass fluffs the hardest and lands lightest, which is why a fresh fiberglass blow can measure at target on the afternoon it goes in and measure short a season later. Cellulose leaves the hose closer to its settled state, so day-one depth is a better predictor of where it ends up, and it still packs down further than fiberglass does. Neither behavior is a defect. It is the reason the coverage chart carries two thicknesses, and the reason a bag count beats a ruler as evidence.
Weight, which is the one nobody checks
One product carries a measured anchor here, Owens Corning AttiCat blown-in fiberglass, 27.5 lb bag, and its published coverage is 39.5 square feet at R-49. That works out to about 0.70 lb per square foot, or roughly 835 lb spread over a 1,200 square foot ceiling. At the maker's published R-60 coverage it is about 0.86 lb per square foot. Spread across every joist in the house, that is a light load. It is why fiberglass rarely raises a question.
Cellulose is heavier. Its maker's chart puts it at 2.02 lb per square foot at R-49, about 2.9 times as much, or roughly 2,424 lb over the same ceiling. That is still a light load spread across every joist, but it is the one worth checking. If the ceiling below is lath and plaster, or drywall that already sags between the joists, look at it from underneath before you add depth in any material. And price the ceiling repair into the decision, not after it.
Pests, and what the additives do not do
Neither material keeps pests out. The borate in cellulose is a fire retardant, made to standards such as ASTM C739. Nobody sells or tests it as a rodent treatment. Rodents nest in both materials, tunnel through both and foul both. No additive on the market changes that enough to count on. This matters most at the hose, because blowing is the one job that hides contamination. New fiber over an old nest looks finished from the hatch, and it still smells the same in July. Where there is a rodent history, cleanup comes first and insulation second. That is the whole argument of the rodent contamination page.
How a correct install is done
Figure 1
A blown install in progress
Cellulose going into an attic through the hose, working from the far corners back toward the hatch. Note the respirator and the lit, planked work path: both are part of the job, not extras.
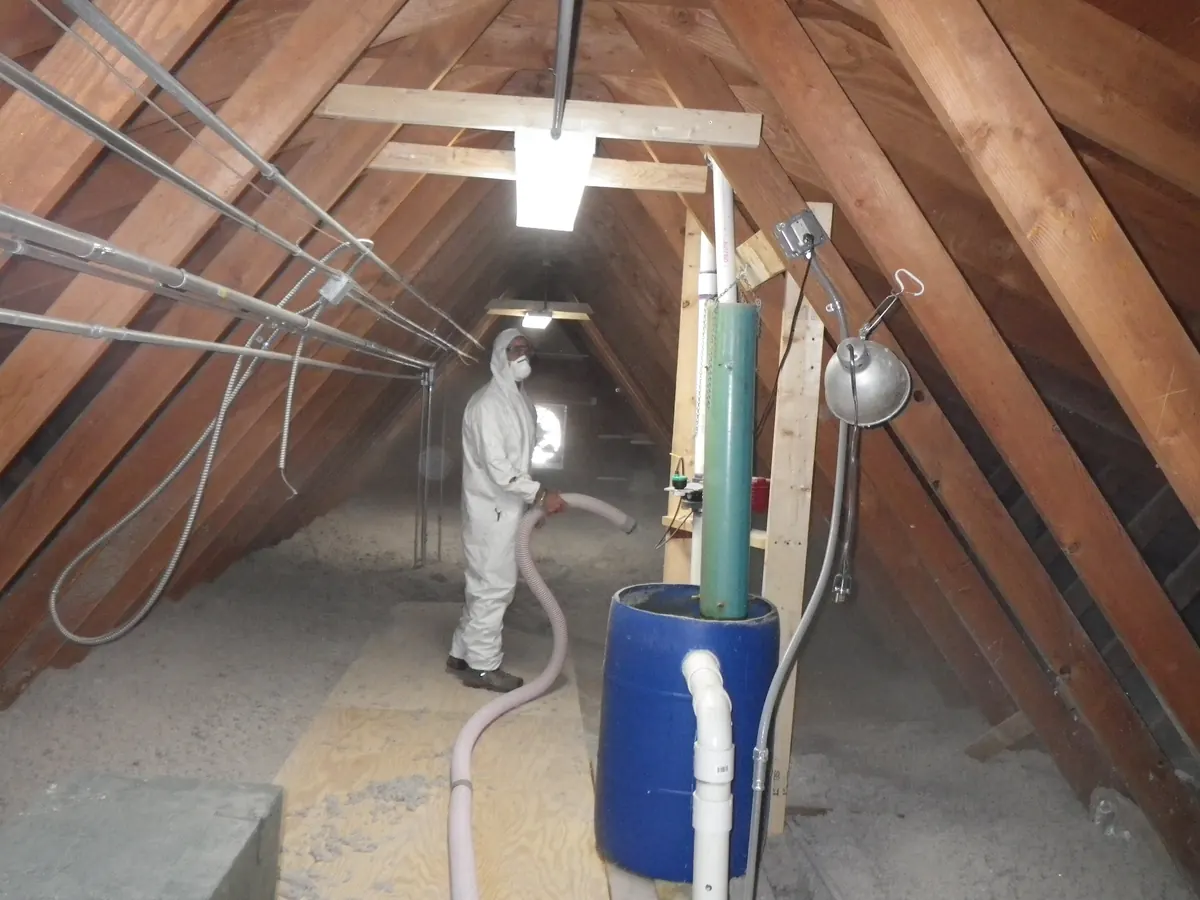
The order matters more than the material. Every step below has to happen before the hose is switched on, because each one becomes either impossible or expensive once the floor is under a deep layer of loose fiber.
- Air seal the ceiling plane first. Top plates, wiring and plumbing penetrations, dropped soffits over cabinets, the chase around a chimney or flue with materials rated for the clearance, bath fan housings, and the perimeter of the hatch. Insulation slows conduction; it does not stop air moving through a hole. Blowing over unsealed penetrations buries them, and the air keeps moving, carrying moisture with it. This is the slow, unglamorous half of the job and it is the half that decides the result.
- Baffle every eave before any material goes near the soffits. Rigid baffles, also called vent chutes, staple into each rafter bay at the eaves. They hold an open air path from the soffit vent up over the insulation. Without them, loose fiber drifts into the soffit and blocks the intake. That is how a working vented attic turns into a damp one. In a vented attic this is not optional, and it cannot be fixed afterwards without crawling back to the eaves.
- Build dams where material must not go. Around the attic hatch. Around a masonry chimney. And around any recessed light fixture not marked as safe to touch insulation. That marking is called an IC rating. Keep whatever clearance the fixture's own label states. For fixtures with no IC rating, the clearances come from the National Electrical Code. That is a model code, and each state or city adopts it with its own changes. So the label in front of you is the authority. If a fixture has no label you can read, treat it as one that must be kept clear.
- Staple depth markers to the framing. Printed rulers marked in inches, stapled to joists or trusses, spread across the attic including the far corners, each one showing the target depth. They are cheap, they are what an inspector looks for, and they turn "it looks deep enough" into a number anyone can read later from the hatch. Where material is going over an existing layer, set them to the finished total measured from the drywall, not to what is being added on top, or the job reads correct and is short.
- Blow from the far corner back toward the hatch. The hose gets shorter as the work proceeds and nobody has to wade back across finished material, which compresses it. Even depth is checked against the markers as the work goes, not judged at the end.
- Treat the hatch separately. A hatch or pull-down stair gets rigid board or a batt fixed to its back and weatherstripping around the frame. It never gets buried: an unsealed hatch under a pile of loose fiber is both an air leak and a mess waiting for the next person who opens it.
- Count the bags. The number of bags emptied, checked against the coverage chart for the product, is the only measurement that survives settling. See the next section for why.
What a bad install looks like
Bad blown-in jobs fail in a small number of repeatable ways, and every one of them is visible from the hatch or from a short crawl. Depth drifts: thick where the installer stood near the hatch, thin at the eaves and in the corners the hose barely reached. Soffit vents are packed solid because no baffles went in first. There are no depth markers anywhere, so nothing can be checked. Material sits banked against a recessed light fixture that carries no insulation contact rating. The hatch is buried. Nothing was air sealed, so the ceiling penetrations are still open, just invisible. And the whole floor was blown to the settled target on the day, which reads correct with a ruler that afternoon and reads short a season later.
Settling, and why installed depth has to exceed label depth
Loose fiber leaves the hose full of entrained air. Over the following weeks and months it compacts under its own weight, and the layer that measured correctly on install day measures less afterwards. That is why the coverage chart on a loose-fill package, required to be there under the FTC R-value Rule (16 CFR Part 460), states both an installed thickness and a settled thickness for each labeled R-value. The settled figure is the one that has to meet your target.
The clearest evidence is in the manufacturer's own coverage numbers. Take the published coverage for the anchor product at three labeled R-values, and multiply R by the square feet one bag covers:
| Labeled R-value | Sq ft per bag | R times sq ft | Lb per sq ft |
|---|---|---|---|
| R-19 | 110.7 | 2,103 | 0.25 |
| R-30 | 68.5 | 2,055 | 0.40 |
| R-49 | 39.5 | 1,936 | 0.70 |
If R-value scaled cleanly with depth, that third column would be flat: one bag would deliver the same R times area however thick you spread it. It does not. It falls by about 5.6 per unit of R, so the same bag delivers roughly 8 percent less at R-49 than at R-19. The material is compressing itself. Deeper piles are denser piles, and denser loose-fill gives less R per inch than the shallow layer the R per inch figure was measured on.
That leaves a trap in the math. Scale the R-19 coverage straight up to R-49 and you predict 42.9 square feet per bag. The maker actually publishes 39.5. So an order built on that prediction comes up short by the same 8 percent the row above lost. It is the same loss, seen from the other end. And it shows up late in the day, as either a second trip to the store or a floor spread thinner than your target. The same trap hides inside any calculator that divides a target R-value by a fixed R per inch. That is why our attic insulation calculator works from R times coverage instead of from coverage alone.
So: work to bags per area and to settled thickness, not to inches alone. On a 1,200 square foot attic, the anchor product's published R-49 coverage gives about 30 bags, and its published R-60 coverage about 38. Round up rather than down: a bag over is a shelf in the garage, a bag short is a thin stripe across the far end of the attic and a second trip. Every product differs, and the bag label for whatever is actually blown into your attic is the authority over any table, including this one.
Inspect the finished job in ten minutes
Do this before the crew leaves if you can, and before the invoice is paid either way. A head and shoulders through the hatch with a torch and a rigid ruler covers most of it.
- Depth at five points. Push the ruler down to the drywall, not to the top of a joist, at five places spread across the attic including one near the eaves and one in a far corner. All five should read the installed thickness on the invoice. Any point noticeably shallower than the others is a drift problem, not a measuring error.
- Joist tops. If you can see the tops of the ceiling joists anywhere, the depth there is no more than the joist. Under the American Softwood Lumber Standard PS 20, dressed lumber measures 5.5 inches for a 2x6, 7.25 inches for a 2x8, 9.25 inches for a 2x10. So even the deepest of those, filled to the top with blown fiberglass, is only about R-20 to R-24. That falls short of every ENERGY STAR attic recommendation, including the R-25 figure for the mildest zone. On a finished job, visible joist tops mean the hose never got there.
- Eaves. Look along the perimeter for baffles standing in the rafter bays and a clear gap above the soffit vents. Loose fiber packed into a soffit is a defect, not a thorough job.
- Bag count. Ask for the empty bags to be left in the driveway, or for the count and the product name written on the invoice. Compare it with the coverage chart. It is the one check settling cannot erase.
- Fixtures and the hatch. Dams standing around any recessed fixture without an insulation contact rating, and around the chimney. The hatch insulated on its back and weatherstripped, not buried.
- Paperwork. Product name, labeled R-value, number of bags installed, and installed and settled thickness. A quote that says only "blow attic to R-49" leaves nothing to check later.
Checking depth that is already down, rather than planning a new install? The depth checker turns inches into an R-value range and compares it with the recommendation for your climate zone.
Rent the machine, or hire it out
Work down the table and stop at the first row that describes your attic. The rows are ordered so that the ones that overrule everything else come first.
| If this is true | Do this |
|---|---|
| Loose vermiculite anywhere on the floor | Blow nothing. Treat it as potentially asbestos-containing per EPA guidance and read the vermiculite page before anything else |
| Rodent contamination, mold, or an active roof leak | Fix the cause and clear the contamination first. New material blown over either one buries the problem and pays for it twice |
| Knob-and-tube wiring, or fixtures with no legible rating | Hire, after an electrician has looked at it. Burying wiring you cannot identify is the one mistake here with a fire consequence |
| The ceiling plane has not been air sealed | Do the air sealing first, whoever does it. Blowing over unsealed penetrations wastes most of what the depth was supposed to buy |
| No safe route: low pitch, no walkable framing, ducts filling the space | Hire. The hose reaches where a person should not, and that is what the crew is being paid for |
| The material is cellulose | Hire, or expect a harder job. The denser material lands compact and is harder to blow to an even depth from a rental machine, and evenness is what the R-value on the invoice rests on |
| Open, walkable attic, existing material dry and clean, two able people, fiberglass | Renting is reasonable. Machine from the rental counter, baffles and depth markers bought first, one person on the hopper and one on the hose. On a big floor, or a target of R-60, budget a second machine day: each bag covers less area as the target rises, so bag count and hopper time climb faster than the target does |
The recommendation. The first two rows are stop signs rather than hiring decisions: fix the attic before anyone blows anything into it. Rows three to five are hire. Cellulose from a rental machine is a judgement call rather than a bar. If only the last row applies, rent, and budget a full day rather than an afternoon, because the air sealing underneath is the part that takes it. Material for the anchor product at retail shelf price on a 1,200 square foot attic to R-49 is roughly $2,050 before the machine, the baffles or the respirators, which is the figure to compare a quote against. The blown-in cost page builds the installed number from the BLS trade wage and that same bag price, and states which of its inputs are estimates.
Either way, wear a fitted respirator, sealed eye protection and gloves, and cover your skin. Both materials irritate your lungs in a closed, hot, airless space. It helps to know how the rules run here. OSHA's breathing protection standard binds an employer over the crew it sends, so a contractor's people work under it. A homeowner in their own attic is outside it completely. On a rented machine, protecting yourself is nobody's job but yours. And getting the respirator to actually fit is the part people skip.
Get quotes for blown-in insulation
Tell us the job and your ZIP. We pass it to a licensed contractor who works in your area.
A marketing service, not a licensed contractor. Insulation work is performed by independent licensed local contractors.
- What happens next?
- Your request goes to a licensed insulation contractor near you, usually within about an hour during the day.
You may not need this
A machine day is the easiest thing to book and often not the thing that is wrong. Three checks before any bags are ordered.
- Measure the settled depth yourself, rather than trusting the last invoice. A layer blown to a settled target years ago has been compacting ever since, and a layer blown to the wrong number was never at target at all, so the paperwork is not evidence. Push a ruler down to the drywall at five spots across the attic, then take the typical reading, not the deepest. Now compare it with the recommendation. For climate zones 4 through 8, ENERGY STAR puts an attic that already has 3 to 4 inches at R-49, and a bare one at R-60. Warmer zones get lower targets. Once you are within about R-10 of your zone's number, more depth pays back slowly. That threshold is our estimate, not a measurement. Heat flow drops as 1 over R, so the last inches save a small fraction of what the first ones did.
- If only the eaves are short, only the eaves need blowing. A blown attic is rarely thin all over. It is thin in the last few feet at the edges, where the hose reached worst and where a missing baffle let material drift into the soffit. If the middle measures at target and the edges measure half that, this is a few bags and an afternoon at the perimeter, with baffles going in first. It is not a whole-floor job. Measure the edges separately before you accept a price for the whole area.
- Sometimes the depth is fine and the holes are not. An attic already at its zone's recommendation gains almost nothing from another layer while air is still pouring out through a bare hatch, unsealed wall tops and open plumbing chases. Loose fiber slows heat through material. It does nothing about air moving through a hole. Rigid board on the back of the hatch, weatherstripping around its frame, and sealant at the holes is a weekend and a small bill. The remove-or-add-over guide runs the related test on whether the old material should come out at all. We do not sell insulation and we do not install it, which is why this page can tell you that the cheapest correct answer is often a caulk gun and a weekend rather than a machine and 30 bags.
Recommended levels above are ENERGY STAR retrofit guidance, which is based on the 2021 IECC model code. Where the 2021 IECC asks for R-60 in the ceiling, R-49 is enough on one condition. The insulation has to run all the way out over the top of the outside wall at its full depth, with nothing squashing it. That normally takes a raised-heel truss, which lifts the roof to make room. Energy codes cover new building and work done under a permit. They do not usually cover adding insulation to an attic you already have. Which edition applies where you live depends on your state, and often on your city. Your local building department is the only authority on it.
Related
- Every attic insulation material compared
- Fiberglass batts, and where cut material still wins
- What blown-in insulation costs installed
- How many bags and how much depth
- What R-value to aim for, by climate zone
- Air sealing: the step that has to happen before the blow
- Baffles, and what a blown eave does without them
Common questions
Can I scale a bag count from a lower R-value row of the coverage chart?
No. Work from your target row instead: divide the attic floor area by the square feet one bag covers at your target R-value, which is what the coverage chart on the package states. For the product anchored here, a 27.5 lb bag covering 39.5 square feet at R-49, a 1,200 square foot attic needs about 30 bags. Do not scale that from a lower R-value on the same chart. A bag covers less area per unit of R as the target rises, because a deeper pile packs denser, so a count scaled up from the R-19 row comes out about 8 percent short. Every product differs, and the chart on the bag actually being blown is the authority over any table.
Does blown-in insulation settle, and does that matter?
Yes to both, and it is the reason installed depth has to exceed the depth you want to end up with. Loose fiber leaves the hose fluffed with entrained air and compacts under its own weight over the following weeks and months. Cellulose settles more than fiberglass. The coverage chart on the package states an installed thickness and a settled thickness for each labeled R-value, and the settled figure is the one that has to meet your target. A crew that blows to the settled number on day one leaves you short of the R-value on the invoice within a season.
Where do I measure depth from when blowing over an existing layer?
From the drywall, not from the top of the old material. Getting this wrong is the usual way a top-up ends up short. Depth markers get stapled to the joists and read against the finished total, so the number the crew blows to already counts whatever was there. The other half of the same point: your starting figure is what you can measure on the ceiling now, not what the last invoice claimed. The old layer has been settling since the day it went in. Measure in several spots away from the hatch, and use the typical reading rather than the deepest one.
Is blowing insulation a realistic do-it-yourself job?
On an open, walkable attic with a helper, yes. Big-box rental counters lend the machine, and products such as Owens Corning AttiCat are packaged for that route. It is a two-person job: one feeds bags into the hopper at ground level while the other works the hose in the attic. It stops being realistic where the attic has no safe route, where the air sealing underneath it is a bigger job than the blowing, or where the material is contaminated. Air sealing first is what decides the result, and it is the slow part.
How much weight does blown insulation put on the ceiling?
Less than most people expect, for fiberglass. We have one product with a measured anchor: a 27.5 lb bag covering 39.5 square feet at R-49. That is about 0.70 lb per square foot. So a 1,200 square foot attic carries roughly 835 lb of fiberglass, spread across the whole ceiling. Cellulose is heavier: its maker's chart puts it at 2.02 lb per square foot at the same R-49, about 2.9 times the fiberglass, or roughly 2,424 lb over the same ceiling. Two cases are worth a look from below before you add depth: an old lath-and-plaster ceiling, and drywall that already sags.
How do I check the installer put in enough material?
Count bags and measure depth. The package coverage chart turns the floor area into a bag count, as the question above works through, and that count is the one measurement settling cannot erase. Ask for the empties to be left, or for the count and the product name on the invoice. Then push a ruler down to the drywall at five points spread across the attic, including near the eaves. Even depth and the right bag count together are the proof; either one alone is not.