
Attic insulation inspection
By Insulation Report Editorial. Last reviewed August 2026. How we research this.
In brief
An attic insulation inspection you do yourself is worth an hour and answers most of the question. Take a rigid ruler, a flashlight and a fitted respirator. Step only on the framing. Measure the depth in at least five spots away from the hatch, then plan from the typical reading, not the deepest one.
Heat leaves through the thin part. Then identify the material, look for water staining under the roof deck, check the eaves are not packed solid, and check the hatch. That tells you whether you have a project.
What it cannot tell you is how leaky the house is, and that is usually the bigger number. A paid energy audit adds a blower door measurement, thermal imaging, duct testing and a written scope three bidders can price against. Buy that when the symptoms and the depth disagree, or when ducts run through the attic.
This page is for an attic whose history you do not know: a house you have just bought, or one you have lived in for years without going up. The question it answers is whether there is a project at all, and whether the paid version of this inspection is worth buying. The guides hub sets out the order the work happens in once you have decided to do it.
Just paid a crew and want to know whether they did what they billed for? That is a different check, and a much shorter one. It lives on the install guide, as a five-point inspection of a finished job. Everything below assumes nobody has been up there lately and you know nothing yet.
Before you go up
Light it from the side, not from above
A beam raked low across the surface shows drifts, thin spots and the joist tops that a light shining straight down flattens out completely.
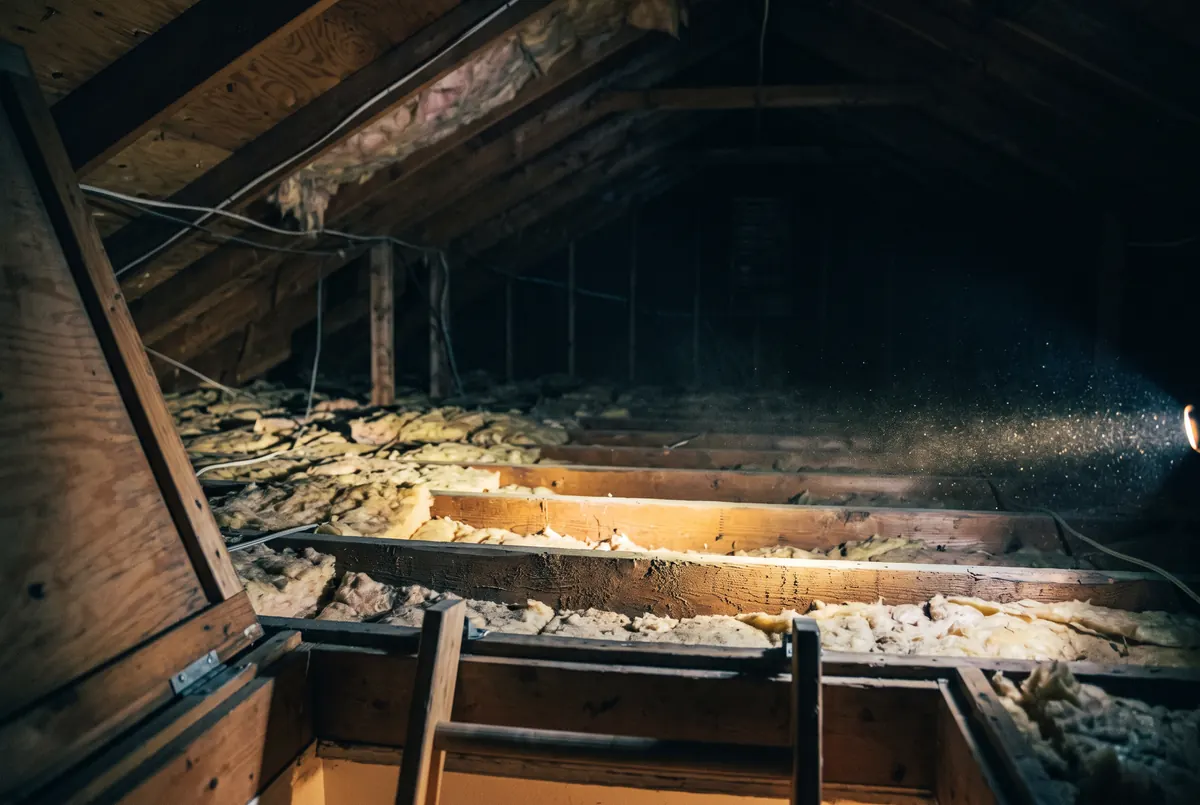
An attic is a confined space with fibrous dust, a ceiling you can put a foot through, and in summer a temperature that shortens how long you can think clearly. The gear is not ceremonial.
Insulation Report earns a commission if you buy through some of the product links on this page. It costs you nothing extra and it does not change which products we recommend or what we say about them.
-
Fitted respirator, not a dust mask
Look for P100 or N95 rated, with a seal that fits your face. A loose surgical-style mask is not this.
Loose fiber and settled dust go airborne the moment you move around up there.
Skip it if Never. This is the item that has no version of the job without it.
-
Look for Goggles that seal against the face rather than open safety glasses.
Fiber falls, and it falls at eye level when you are working under a roof deck.
Skip it if Never, for the same reason.
-
Look for Anything that covers skin. Coated palms beat bare knit for handling batts and hardware cloth.
Fiberglass itches for days and washing does not fully clear it from clothing.
Skip it if You are only opening the hatch to look and measure.
-
Look for Two lengths of rigid board or plywood you can move ahead of yourself.
You step only on framing. Boards spread your weight and give you somewhere to put a knee.
Skip it if The attic already has a walkable deck across the whole area you are working in.
-
Look for A hooded suit rated for particulates. The DuPont Tyvek 400 style is the common one, and it comes in sizes, so buy yours rather than the first size listed.
Fiberglass in clothing survives a wash and keeps itching. A suit you throw away at the hatch ends the problem at the hatch.
Skip it if You are working in cellulose rather than fiberglass and do not mind laundering what you wore, or the job is a ten-minute look with a torch.
-
Look for Strap-on pads with a hard cap, not the soft gardening kind.
The whole job happens kneeling on framing. A joist edge is an inch and a half of wood and your knee finds it within a minute.
Skip it if Your boards are wide enough to kneel on flat, which is most of the point of them.
-
Look for Hands-free. Any output; attics are small spaces.
Both hands are busy, and a torch in your teeth points at the wrong thing.
Skip it if You already own one.
- A fitted respirator, not a dust mask. Both fiberglass and cellulose are respiratory irritants in a hot, confined space, and disturbing settled loose fill puts a lot of it in the air. Add sealed eye protection, gloves and long sleeves.
- A torch or headlamp, a rigid ruler or a steel tape, and a phone camera. Photograph everything you are unsure about from the hatch rather than crawling back later to look again.
- Two boards or a kneeling pad. You step on the framing only, never on the material between the joists, because that is drywall underneath and it will not hold you. Loose fill hides the framing entirely, so probe with a foot before committing weight.
- Someone who knows you are up there. In summer, go early. A dark roof deck turns an attic into an oven by mid morning and heat is the most common reason a survey ends badly.
Where the rules sit: the federal respiratory-protection standard administered by OSHA binds an employer with respect to its crew. A homeowner in their own attic is outside it, which means nobody is going to require any of the above, and it is entirely your call.
When not to enter at all
Four findings mean the survey ends at the hatch.
- Loose gray-brown pebbly granules. That can be vermiculite, which should be assumed to contain asbestos and left undisturbed. Close the hatch. The vermiculite page explains why leaving it alone is usually the correct action, and it carries no quote form for that reason.
- Heavy droppings or nesting. Do not sweep, shake out or vacuum dry droppings. CDC guidance on cleaning up after rodents is to wet the area down first, because the hazard is what goes airborne. Rodent contamination covers the sequence.
- Widespread visible mold. A small patch on sheathing is information. A floor of it is a reason to look from the hatch and no further, particularly if anyone in the house is asthmatic or immunocompromised. See mold in attic insulation.
- Knob-and-tube or damaged wiring, or a roof deck that sags underfoot. Both are somebody else's trade and both are reasons not to add your weight to the problem.
The survey, in order
Hold the light low, not high
A beam raked almost flat across the surface throws shadows into every hollow and over every joist. Pointed straight down, the same attic looks evenly covered.
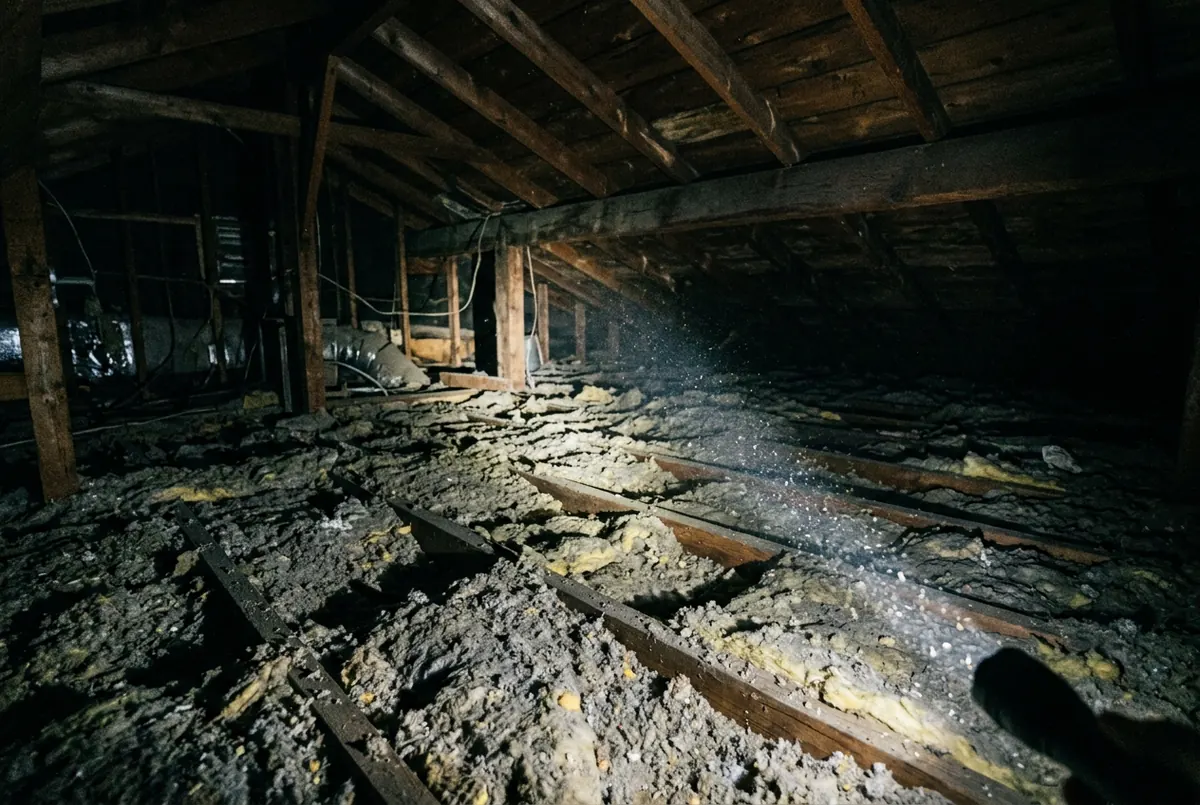
Six checks, and the order matters because the first one that fails ends the rest. Take notes as you go. A survey you have to repeat because you cannot remember the third reading is not a survey.
1. Measure the depth, in several places, away from the hatch
Push a rigid ruler straight down through the material until it stops on the drywall, and read it at the surface without compressing anything. Do that in at least five places spread across the floor: near the middle, in two opposite corners, and at two points along the outside walls where insulation is thinnest.
Plan from the typical reading, not the deepest one. The material near the hatch is the most disturbed and often the deepest, because everyone who has ever been up there has pushed it around. Heat leaves through the thin part of the ceiling, so the number that describes your attic is the one most of the readings cluster around. The thin spots are a separate finding: a patch measuring far below the rest is a levelling job, not a reason to lower the number you plan against. This is the protocol the rest of the site works from, so the depth checker, the add-over guide and the remove-or-add-over test all read a measurement the same way.
Depth converts to R-value by material, and only approximately. The depth checker does the conversion and compares it with the level recommended for your ZIP. One caveat that applies to every loose-fill conversion, including that one: settled density rises as installed thickness rises, so loose-fill R-value does not scale strictly with depth, and a depth reading is an estimate of R rather than a measurement of it.
2. Identify what is up there
You need this to convert depth into R at all, and it changes what happens next. The R per inch figures below are the aged, settled ranges this site carries, not label values for new material.
| What you see | Most likely | R per inch | What it means for the survey |
|---|---|---|---|
| Loose white, yellow or pink fluff, glassy fibers that glint under a torch | Blown-in fiberglass | R-2.2 to 2.7 per inch | Settles less than cellulose. Almost always a candidate for adding depth over the top rather than removing. |
| Gray, shredded, paper-like, sometimes with visible print flecks, dusty when disturbed | Blown-in cellulose | R-3.2 to 3.8 per inch | Settles more, so measure what is there now rather than trusting whatever the house was built to. Material specification ASTM C739. |
| Dense, dark gray to brown, granular, noticeably heavier and does not pull apart like fiberglass | Loose-fill mineral wool | R-2.8 to 3.7 per inch | Common in older attics and still sold. Material specification ASTM C764. |
| Rectangular blankets fitted between the joists, often with kraft paper or foil on one face | Fiberglass batts | R-2.9 to 3.8 per inch | Note which way the facing points and whether the batts are gapped or compressed. A facing must never end up buried between two layers. |
| Loose gray-brown pebbles, some accordion-shaped, with a shiny mica-like glint | Possible vermiculite | Do not measure it | Stop the survey. Assume it contains asbestos, leave it undisturbed, and close the hatch. |
| A shiny foil sheet stapled under the rafters, or foil-faced material laid on the floor | Radiant barrier | No R-value per inch | Reflective product, not bulk insulation. It cannot be added to your attic total. Sheet material specification ASTM C1313. |
The last row is the one that catches people out. A radiant barrier reflects radiant heat rather than resisting conduction, so it has no useful R-value per inch and cannot be counted toward an R-value target. It is measured differently from bulk insulation and the two do not add together. If your attic has foil under the rafters and four inches on the floor, you have four inches on the floor. The radiant barrier page covers how it is measured and where it does real work.
3. The joist sight test, priced properly
Before the ruler comes out you already have a rough answer from whether the tops of the ceiling joists are visible. Ceiling joists are dressed under the American Softwood Lumber Standard PS 20 to 5.5 inches for a 2x6, 7.25 inches for a 2x8, 9.25 inches for a 2x10, so material level with the joist tops is material at one of those three depths. What that is worth depends entirely on which material it is, which is why "you can see the joists, therefore you are short" is only usually true.
| Joist | Actual depth | Filled flush, blown-in fiberglass | Filled flush, blown-in cellulose | Verdict |
|---|---|---|---|---|
| 2x6 | 5.5 in | R-12 to R-14 | R-17 to R-20 | Short of the recommended level in every climate zone, in either material |
| 2x8 | 7.25 in | R-15 to R-19 | R-23 to R-27 | Short of the recommended level in every climate zone, in either material |
| 2x10 | 9.25 in | R-20 to R-24 | R-29 to R-35 | Reaches zone 1's R-30 at the top of the cellulose range. Short in every other zone |
These are conversions from aged R-per-inch ranges, so they estimate R rather than measure it. Loose fill in particular does not scale cleanly with depth: settled density rises with installed thickness, so a deeper pile returns less R per inch than a shallow one. Treat the figures as a bracket, and the bag coverage chart for the specific product as the authority.
ENERGY STAR recommends a total of R-30 in zone 1 and R-60 in zones 4 through 8 for an attic with no existing insulation. So the deepest common joist filled flush with cellulose is a pass in the warmest zone and a long way short in the coldest, while the same depth in blown fiberglass does not clear anything. Name the material before you draw the conclusion. The R-value targets page has the full table by zone.
The rest of the survey: moisture, the eaves and the hatch
4. Moisture staining and daylight
Point the torch at the underside of the roof sheathing and work along it. You are looking for dark rings or streaks, black staining at the ridge, and rusted or wet nail points coming through the deck, which are the cheapest early sign that warm moist air is condensing up there. Then look down: matted or flattened material, a patch darker than everything around it, or damp on the top face of the ceiling drywall.
Distinguish two sources, because the fix is different. A roof leak stains a path from a point above, is worst after rain, and often shows daylight. Condensation is diffuse, worst in winter, and concentrates over bathrooms, the kitchen and the attic hatch. A bath fan ducted into the attic rather than through the roof or wall produces a very local version of the second and is common enough to be worth a deliberate look.
Daylight is not automatically bad. You should see it at the soffit vents, and at a ridge vent. Daylight in the middle of a rafter bay, around a flue, or at a flashing is a roof finding, and it outranks anything on this page.
5. The eaves, which is where most of the failures hide
Crawl or look toward the outside walls and check whether loose fill has drifted or been blown into the eaves and packed the soffit solid. This is the single most common defect in an otherwise reasonable attic, it is invisible from the hatch, and it is the reason a well-insulated attic ends up with a damp deck.
One number is worth carrying up the ladder with you. The Model International Residential Code, Section R806 (roof ventilation), 2021 edition calls for at least 1 inch of open air space between the insulation and the roof sheathing wherever an eave vent is fitted. That is exactly the gap a baffle exists to hold, and exactly what a packed eave destroys. It is also the only venting number you can actually see on a survey. How much total vent area the attic needs is math on the floor area, not something visible from the hatch.
These come from the model International Residential Code. Your state, and often your city, decides which edition applies where you live and whether it was changed. Your local building department is the only authority on that. And these rules cover new building and permitted work, not a top-up you choose to do on an attic you already have.
So what you are recording is simple: at each soffit bay, is there a baffle, and is there a clear channel above it? A vent with insulation packed against it contributes nothing, however many of them the house has. The baffles page covers fitting them, and the ventilation section works out how much net free area an attic of a given size needs, at both ratios.
6. The hatch, and the signs of pests
The hatch is a hole in the middle of the ceiling plane and it is the fastest thing on this list to fix. Note whether it is weatherstripped, whether anything is insulating its back, and whether the material around it has simply been heaped up to the edge of the opening.
For pests, look for five things. Droppings along the joists and against the outside walls. Tunnels and runs through the loose fill, which look like a network of channels rather than random mess. Nesting material gathered in corners. Chewed wire insulation. And a smell that comes back every time the attic heats up. Then look for how they got in. Gaps at the soffit and fascia. Around vent openings. And where the roofline meets a lower roof. Take the fouled material out without closing the entry points and you buy the same job twice.
What each finding means
Boxes on boards are a thin spot you cannot see
Compressed insulation loses R-value roughly in proportion to how far it is squashed. A decked storage area reads as covered from the hatch and performs like a hole.
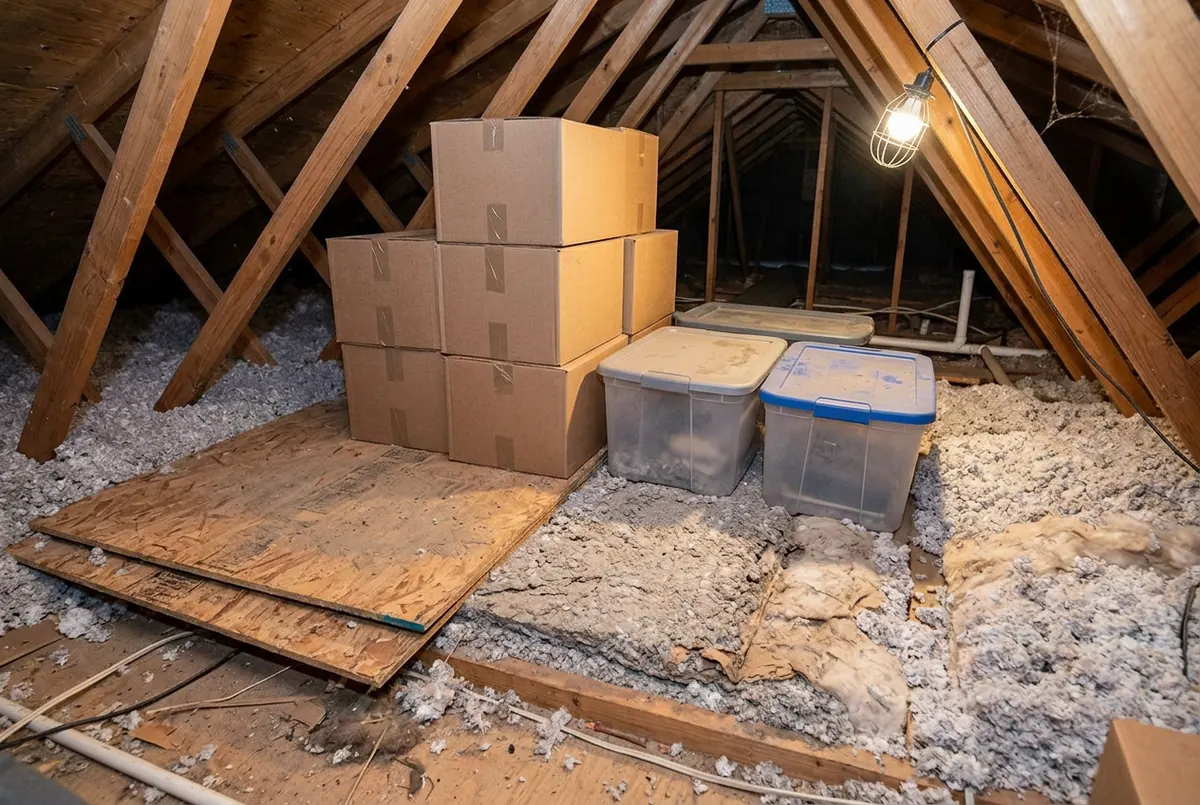
Work through your notes against this. The verdict column is what to do next, not what to buy.
| What you found | What it most likely means | Verdict |
|---|---|---|
| Typical depth well below the joist tops, material dry and clean | A genuine depth shortfall, and the one finding that is unambiguous | Air seal, then add depth. Price the job |
| Depth converts to within about R-10 of the level recommended for your zone | Near target, on an estimated threshold this site sets rather than a measured one | Do not buy depth. Spend the money on air sealing |
| Loose fill packed solid into the eaves, no baffle visible above the soffit | The airflow that dries the roof deck is blocked, whatever the depth reads | Baffles before any new material goes in |
| Dark staining, or rusted nail points, on the underside of the roof sheathing | Moist indoor air is reaching a cold deck, or the roof is leaking | Find the water and the air leak first. Depth over this makes it worse |
| Daylight in the middle of a rafter bay, at the ridge, or around a penetration | A hole in the roof or failed flashing, not an insulation finding at all | Roofer before insulator |
| One patch of matted, flattened or damp material, everything else dry | A point leak, or a bath fan discharging into the attic instead of outside | Trace it. Wet insulation does not recover on its own |
| Droppings, tunnels through the loose fill, nesting, or a smell that returns as the attic heats | Rodent contamination, and the entry points are still open | Seal entry, then remove. Do not sweep or vacuum dry droppings |
| Loose gray-brown pebbly granules with a mica glint | Possible vermiculite, which should be assumed to contain asbestos | Stop, disturb nothing, and treat it as a separate licensed trade |
| Batts with the paper or foil facing showing on the upper side | A vapor retarder facing the wrong way, or a second faced layer already added | Do not add another faced layer over it |
| Bare plywood hatch, no weatherstrip, material simply heaped around the opening | An unsealed hole in the middle of the ceiling plane | Insulate and weatherstrip it. Cheapest item on this list |
| Storage boxes, a plywood platform, or walkboards resting straight on the insulation | Compressed material, which loses R-value in proportion to how far it is squashed | Raise the platform above the target depth, or accept the loss knowingly |
| Supply and return ducts running through the attic | Duct losses that no amount of ceiling depth addresses | This is the case where a paid audit earns its fee |
Two of those rows point to longer pages. Remove or add over works through the contamination and damage decision in steps. Insulating over existing insulation covers the facing rule, and what a second layer can and cannot fix.
What a paid inspection adds
Everything above is observation. It establishes what is on the ceiling and what condition it is in. What it cannot do is measure the two quantities that most often decide whether the house performs, because both need instruments and neither shows up on a ruler.
- A blower door test. Your ruler measures the conduction term. The blower door measures the air-leakage term, which your survey cannot reach at all and which is frequently the larger of the two. That is the whole reason to buy one on top of the survey you have just done. Air sealing covers how the test works and what the number means.
- Thermal imaging. An infrared camera reads surface temperature. So when there is a temperature difference across the ceiling, it shows what the flat surface of loose fill hides. Voids. Gaps at the eaves. Edges scoured by wind. Missing sections behind knee walls. And air bypasses at the tops of walls and in chases. Run it with the blower door pulling the house down in pressure and it also shows air moving where it should not. What it cannot do is see through the material, or give you an R-value.
- Duct leakage testing. Where supply and return ducts run through the attic, their losses are outside the ceiling plane entirely, so no depth on the floor addresses them. A pressurized duct test measures the leakage directly, and it routinely reorders the priority list.
- A written report. This is the underrated part. A written scope, in priority order, is what lets three contractors bid on one job instead of three different guesses. It turns "add insulation" into a spec: a target R-value, an air sealing list and a note on ventilation.
Who does them: home energy auditors and raters, typically certified through programs such as the Building Performance Institute or RESNET, and the assessment usually includes a combustion safety check where the house has atmospherically vented gas appliances. An audit is not a code inspection and certifies nothing. It is a measurement and a report.
There is an order to ask in. Check whether your utility runs a subsidized or free home energy assessment before paying retail for one, since many do. Note that an insulation contractor will normally assess the attic free as part of quoting, which is useful and comes with the standing caveat that the person assessing also sells the fix. An independent auditor charges a fee and sells you nothing but the report, which is what you are paying for.
When the paid version is worth it
Buy the audit when at least one of these is true.
- Ducts run through the attic. The measurement you most need is one you cannot take, and it frequently outranks depth.
- The house performs worse than what you measured suggests. That gap is almost always air leakage or ducts, and guessing which is how money gets spent on the wrong one.
- Parts of the assembly are inaccessible. Knee walls, cathedral slopes, flat-roof sections and finished attic rooms cannot be surveyed from a hatch, and thermal imaging is the only practical way to read them.
- The job is large enough that a written scope pays for itself. If you are about to take bids on a whole-attic job, a specification everyone prices against is worth more than the fee, because it makes the quotes comparable.
- You want the before-and-after number. If you intend to prove the work performed, the blower door has to run before it as well as after.
The free survey settles it on its own when all of these hold.
- The attic is open, walkable and fully visible from the hatch.
- It is dry, with no staining on the deck and no damp material.
- No ducts run through it.
- The depth measurement puts you clearly on one side or the other of the level recommended for your zone, rather than near the line.
In that case you already have the answer, and the audit fee is better spent on the air sealing it would have recommended. The payback question covers why this site publishes no dollar savings figure and what does produce one for your specific house.
The decision, in one pass
Work down. The first row that matches your survey is your answer.
| If this is true | Then |
|---|---|
| Vermiculite suspected, at any depth | Stop surveying. Leave it undisturbed and treat it as a separate licensed trade, not an insulation job |
| Water staining, damp material, or visible mold | Fix the water first. No insulation decision is valid until the attic is dry |
| Ducts run through the attic, or the bills do not match what you measured | Buy the audit. The blower door and the duct test measure the terms your ruler cannot |
| Knee walls, cathedral slopes, or areas you cannot see into or reach | Buy the audit for the thermal imaging. It reads the parts of the assembly you never got eyes on |
| Open, dry attic and the depth measures well short of your zone | Skip the audit. Get quotes to air seal and top up, and spend the audit fee on the work |
| Open, dry attic and the depth is within about R-10 of your zone (this site's estimated threshold, not a measured one) | Skip both. Air seal the ceiling plane and stop there |
The calculator takes your ZIP and floor area and returns the target, the inches and an installed cost bracket, which is enough to sanity check any quote that comes back.
You may not need any of this
A real share of attics survey clean. Say the material is dry, the eaves are clear, and the depth works out to within about R-10 of the level recommended for your zone. (That threshold is our own estimate, not a measured figure.) Then you have no depth project. Buying an inspection to confirm it is buying a second opinion on a number you already have. Heat flow drops as 1 over R, so the last inches cut far less heat than the first ones did. The useful spend in that case is sealing the ceiling. It costs less than depth, and it fixes the problems depth does not. Air sealing before insulating covers it. We do not sell insulation and we do not install it, which is why this page can end on that.
Get quotes from licensed insulation contractors
Tell us the job and your ZIP. We pass it to a licensed contractor who works in your area.
A marketing service, not a licensed contractor. Insulation work is performed by independent licensed local contractors.
- What does it cost?
- A 1,200 square foot attic blown to R-49 runs about $2,600 to $3,200 installed, from this site's own cost model dated August 2026. Two of its parts are estimates, so read it as a range and not a quote. See the full working and the price by attic size.
- What happens next?
- Your request goes to a licensed insulation contractor near you, usually within about an hour during the day.
Related
- The guides hub: the order the work happens in
- Signs you need new insulation, and signs you do not
- How to install attic insulation, including checking a finished job
- Baffles: what they do and how they are fitted
- Turn a depth measurement into an R-value range
- Name the material you found, from the hatch
- What to take up there, and what to measure with
Common questions
How do I inspect my attic insulation myself?
Wear a fitted respirator, sealed eye protection, gloves and long sleeves, take a torch and a rigid ruler, and step only on the framing. Measure depth in at least five spots spread across the floor and away from the hatch, and plan from the typical reading rather than the deepest, because heat leaves through the thin part. Then identify the material, look at the underside of the roof deck for staining, check whether loose fill has packed into the eaves, check the hatch, and look for droppings or tunnels. That is the whole survey and it takes about an hour.
How much does an attic insulation inspection cost?
Ask in this order. Many utilities run subsidized or free home energy assessments, so start with yours before paying retail. Insulation contractors will usually look at an attic free as part of quoting, which is genuinely useful and comes with the obvious caveat that the person assessing the job also sells the fix. An independent auditor charges a fee and sells you nothing but the report, which is the point of using one. What a paid assessment is worth depends on what it includes: a blower door test, thermal imaging and duct leakage testing are the parts a homeowner survey cannot reproduce.
Do I need a blower door test if I only want to know about my attic insulation?
No. A ruler and a torch answer the insulation question: depth, material, evenness, whether the eaves are clear and whether anything is wet. What they cannot reach is the air-leakage term, which is frequently the larger one, and that is the gap a blower door fills. So the test is worth buying when the survey has already told you the depth is reasonable and the house still feels drafty or expensive, or when you want a before-and-after number to hold a contractor to. It measures the whole building envelope rather than the ceiling alone, so read the result as a house figure, not an attic one.
Can a thermal camera see through insulation?
No. An infrared camera images surface temperature, so what it shows is the pattern of warm and cold on the surface it is pointed at, not the material behind it. That is still the fastest way to find missing sections, gaps at the eaves and air bypasses behind knee walls, because those read as temperature anomalies. Two limits worth knowing before you pay for it: the camera needs a real temperature difference across the assembly to show anything useful, and a thermal image is a picture, not an R-value measurement.
Is a home energy audit worth it for insulation alone?
Often not. If the attic is open, dry and clearly short of the level recommended for your zone, you already know the answer. That audit fee is better spent on air sealing. An audit earns its money when the picture does not add up. Ducts in the attic. A house that performs worse than the depth suggests. Sections you cannot see into. Or a big job where you want three bidders pricing one written scope instead of three different guesses.
How often should attic insulation be inspected?
There is no service interval. Insulation that stays dry and undisturbed does not wear out. So inspect on events, not on a calendar. After a roof leak or a storm, or after any trade has worked up there. When you see or hear rodents, when new ducts or wiring go in, and before you buy a house. Each of those changes something the last look settled. Between events, the survey costs you an hour and tells you whether anything moved.